Table of Contents
Octopus System Setup
Install Notes
- OS install.
- OS: Dark mode.
- OS: Windows Update.
- OS: Apps > Installed apps, get rid of crap.
- OS: Sign in, facial & fingerprint recognition.
- OS: Unpin shit from Start.
- OS: Windows Terminal → default terminal application.
- OS: PowerShell > Admin > Winget install browsers & applications.
- Brave: LastPass extension.
- Brave: Set up profiles & sync.
- Brave: Set new tab page.
- Brave: Set up settings.
- Brave: Set up search.
- Brave: Set up ad filters.
- Brave: Install Tampermonkey filters.
- OS: Mouse pointer size (3).
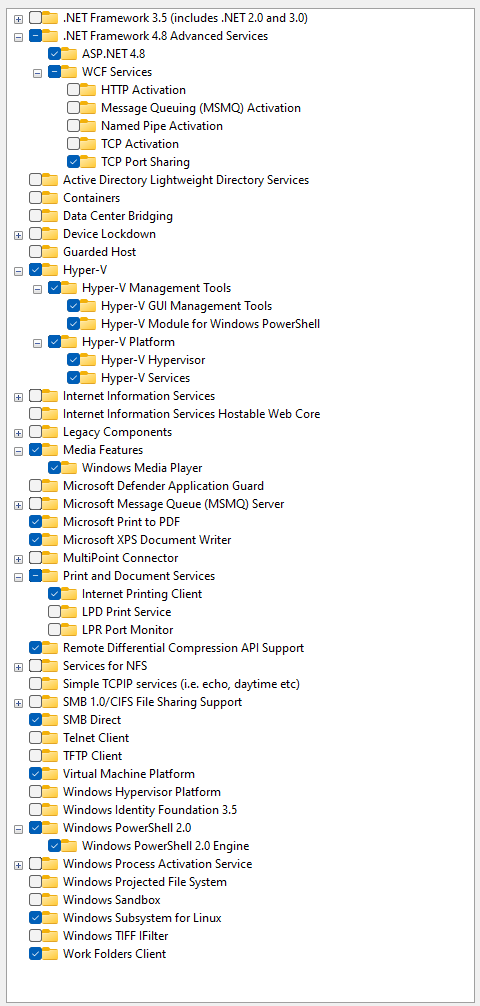
- OS: Windows features.
- OS: Install FiraCode Nerd Font.
- OS: Explorer > Options.
- OS: Install Fira Code font.
- Install SQL Server 2022 Developer Edition
- OneDrive: Turn off 'backups'.
- OS: Taskbar turn off search & widget.
- Notepad++: Enable dark mode.
- OS: PowerShell: set-executionpolicy Unrestricted -scope currentuser
- Install CrowdStrike.
- Install DriveStrike.
- Install Vanta.
- Notepad++: Style Configurator, FiraCode Nerd Font Mono + enable global font
- Visual Studio Code: Set up sync.
- Terminal: Default profile: 'PowerShell' (which is 7.x)
- Zoom: Set up video & audio settings.
- OS: BitLocker, verify enabled, backup restore key.
- OS: Set up PowerShell profile script.
- Terminal: Defaults > Appearance, Font FiraCode Nerd Font Mono, Font size 10.
- OS: PowerShell: Oh-my-posh set up.
- Git: Set up settings.
- AHK: Set up auto load & new bin location.
- OS: Desktops set up.
- OS: Language & regional set up.
- Visual Studio: Install desktop dev.
- Visual Studio: Extensions.
- Install Microsoft Office.
- OS: Taskbar, Visual Studio, run as admin.
- Install Paint.net.
- Anki: Set up & sync.
- OneCommander: Set up favourites.
- OS: Set up backups.
- OS: Set up start up apps.
- Visual Studio: Set up snippets.
- OS: Set up screen saver to keep Vanta happy:
- Screen saver: (None)
- Wait: 60
- On resume: ✔
Application Install
Winget
# Dev Tools
winget install --id 'Microsoft.SQLServer.2019.Developer'
winget install --id 'Microsoft.DotNet.Framework.DeveloperPack_4' -v 4.6.2
winget install --id 'Microsoft.DotNet.SDK.6'
winget install --id 'Microsoft.DotNet.SDK.7'
winget install --id 'Microsoft.PowerShell'
winget install --id 'Git.Git'
winget install --id 'OpenJS.NodeJS'
winget install --id 'WinMerge.WinMerge'
winget install --id 'JanDeDobbeleer.OhMyPosh' -s winget
winget install --id 'Docker.DockerDesktop'

# Browsers
winget install --id 'Brave.Brave'
winget install --id 'Google.Chrome'
winget install --id 'Opera.Opera'
winget install --id 'Mozilla.Firefox'

# IDE / Text Editors
winget install --id 'Notepad++.Notepad++'
winget install --id 'Microsoft.VisualStudioCode'
winget install --id 'Microsoft.VisualStudio.2022.Professional'
winget install --id 'Microsoft.AzureDataStudio'
winget install --id 'Microsoft.SQLServerManagementStudio'

# General Apps
winget install --name 'One Commander'
winget install --id 'WinDirStat.WinDirStat'
winget install --name 'Sysinternals Suite'
winget install --id '7zip.7zip'
winget install --id 'SumatraPDF.SumatraPDF'
winget install --id 'GIMP.GIMP'
winget install --id 'Zoom.Zoom'
winget install --id 'Spotify.Spotify'
winget install --id 'PeterPawlowski.foobar2000'
winget install --id 'Lexikos.AutoHotkey'
winget install --id 'Anki.Anki'

# PowerShell modules
Install-Module BurntToast
Manual Installs
- Paint.Net
- Microsoft SQL Server 2019 - Developer Edition (64-bit)
- Mp3 Direct Cut
- LTSpice
- Fritzing
Command Line Checks
Open a prompt and check that each of these commands work. Version numbers are as of 22-12-2022 and will obviously change over time.
>  dotnet --version
6.0.404
>  node -v
v19.3.0
>  npm -v
9.2.0
>  git version
git version 2.39.0.windows.1
>  docker-compose version
Docker Compose version v2.13.0
System Setup
Enable Long Filename Support
- Start →
RegEdit. - [Registry Editor] Address bar →
Computer\HKEY_LOCAL_MACHINE\SYSTEM\CurrentControlSet\Control\FileSystem - [Registry Editor] Set
LongPathsEnabledto1to enable long filenames. - Reboot.
PowerShell
From admin prompt:
Set-ExecutionPolicy -ExecutionPolicy Unrestricted
Windows Features
Misc
- Fonts. See Fonts setup.
- Bin setup.
Application Setup
Brave
See Chrome / Brave Setup.
Misc
- Git. See Git Cheat Sheet.
Octopus Server Dev Setup
SQL Server
- Open SQL Server Management Studio (SSMS).
- [SSMS] Connect to your local instance.
- [SSMS] In the Object Explorer, right click your local machine and select Properties.
- [SSMS, Server Properties] Select the Security page.
- [SSMS, Server Properties] “Server authentication” → SQL Server and Windows Authentication mode.
- [SSMS, Server Properties] Ok.
- [SMSS] In the Object Explorer, right click your local machine and select Restart. Give it a few seconds to do its thing.
- [SSMS] In the Object Explorer, navigate to (Your server) → Security → Logins.
- [SSMS] Right click the sa login and select Properties.
- [SSMS, Login Properties] Select the General page.
- [SSMS, Login Properties] Override the default password with a known password. Note it down in a safe place as you will need it later.
- [SSMS, Login Properties] Untick Enforce password policy.
- [SSMS, Login Properties] Select the Status page.
- [SSMS, Login Properties] “Permission to connect to database engine:” → Grant.
- [SSMS, Login Properties] “Login:” → Enabled.
- [SSMS, Login Properties] Ok.
Refer to this documentation.
